developers · Oct 1, 2019
Be a Hero: Create Your Own App with Quire API

Last updated: May 28, 2026
The Quire OAuth 2.0 API lets your app act on a user's Quire account without storing their password. You'll need a registered OAuth app (client ID, secret, redirect URL), a four-step authorization flow (configure, redirect, handle response, exchange code for token), and a refresh-token loop because access tokens expire after one hour.
- Which Quire integration approach fits your use case?
- How do you set up an OAuth app for the Quire API?
- How do you set up your development environment for the Quire API?
- How do you make API calls with the Quire access token?
- How do you refresh an expired Quire API access token?
- What are the most common mistakes developers make with the Quire API?
- When isn't the Quire API the right fit?
- Frequently Asked Questions
- Where do you go from here?
Building an app that reads or modifies a user's Quire data starts with one decision: how do you authenticate without ever seeing the user's password? The Quire API answers that with OAuth 2.0. This post walks through the OAuth app setup, the four-step authorization flow, the access-token-and-refresh loop, and the common ways developers get this wrong on the first build.
The 1.0.0 release of Quire's OpenAPI shipped in October 2019 and has remained stable. With OAuth, users authorize your app to access their Quire content (tasks, projects, comments, assignments, tags, due dates) and you never touch their credentials. The user can revoke that access at any time without changing their password, which is why password-storing integrations were a security antipattern before OAuth made them unnecessary.
Which Quire integration approach fits your use case?
Before you wire up the OAuth API, make sure the API is actually the right tool. Quire has four supported integration surfaces in 2026, and they solve different problems.
If you're building a typical app integration (mobile app, web dashboard, sync service), the OAuth API is what you want. The rest of this post assumes you're on that path.
How do you set up an OAuth app for the Quire API?
In order to use Quire API, you’ll need to create an Oauth app.
Create your Quire oauth app
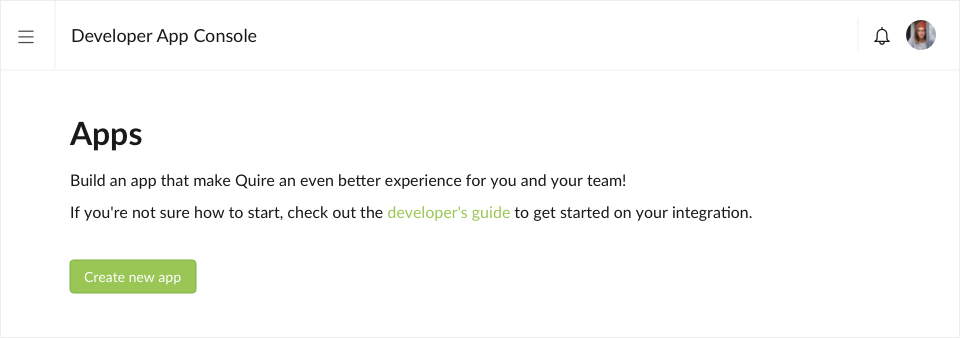
You’ll need to be logged in to your Quire account to create an app.
Go to the Quire developer app console and click on the Create new app button.
Choose the Quire Organization that your app belongs to, the organization members can view/edit all apps belongs to the selected organization.
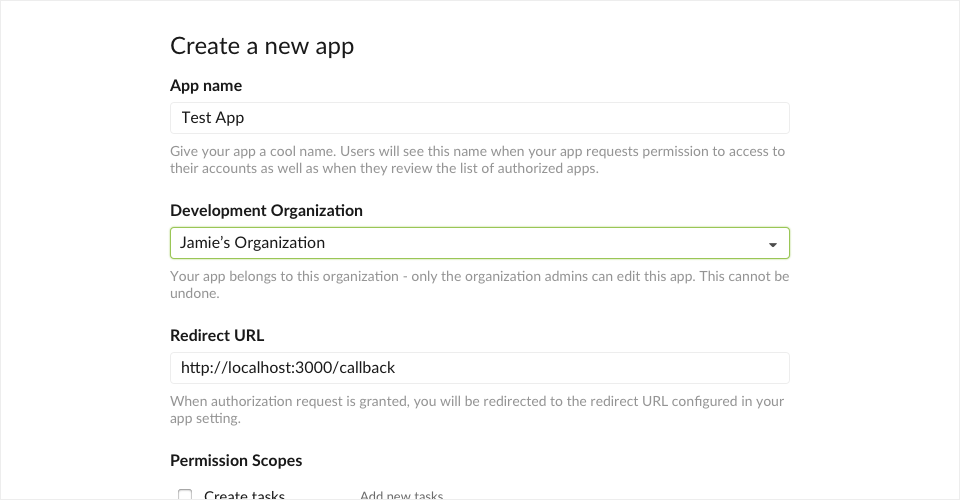
Give your application a name and Redirect URL, we will discuss the role of the Redirect URL later. For now you can supply the following URL:
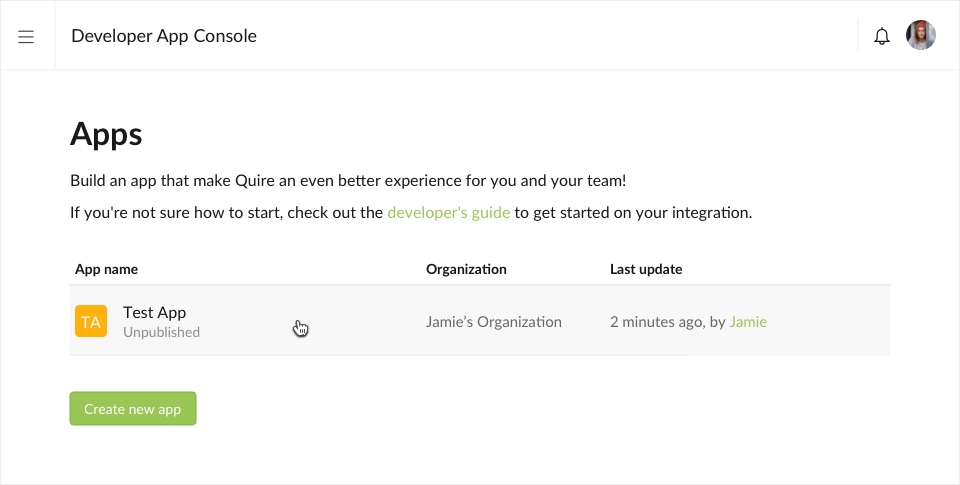
http://localhost:3000/callbackClick the Create new app button, your newly created OAuth application will be presented on the developer console page, allowing you to further configure it.
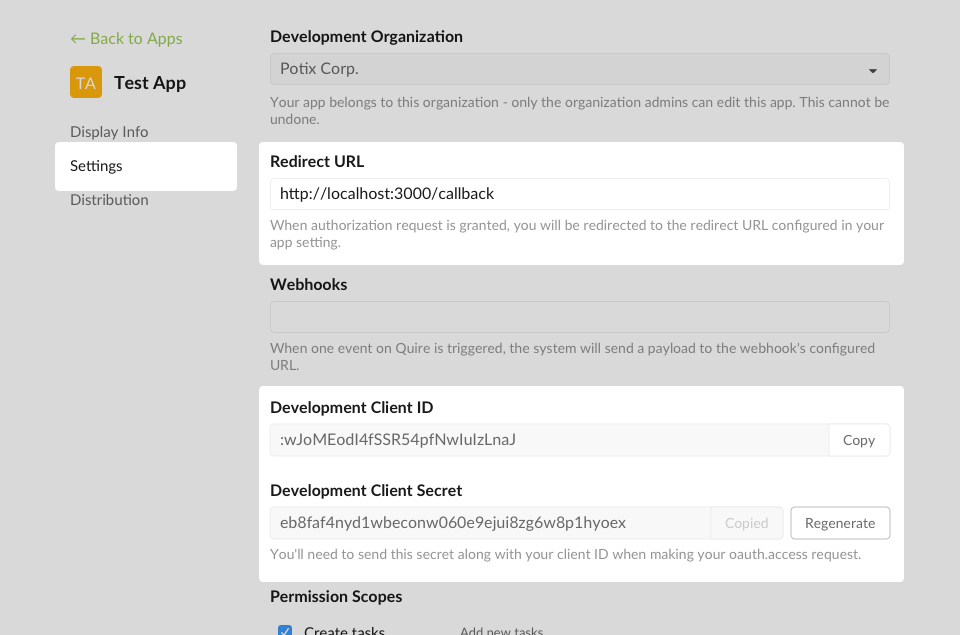
In summary, you should have these three bits of information:
- Development Client ID: :wJoMEodI4fSSR54pfNwIuIzLnaJ
- Development Client Secret: eb8faf4nyd1wbeconw060e9ejui8zg6w8p1hyoex
- Callback URL:
http://localhost:3000/callback
How do you set up your development environment for the Quire API?
Step 1. Configure Your App
Host your application configuration information in your app.
const clientId = ':wJoMEodI4fSSR54pfNwIuIzLnaJ';
const clientSecret = 'eb8faf4nyd1wbeconw060e9ejui8zg6w8p1hyoex';
const redirectURI = 'http://localhost:3000/callback';

const authorizationUrl = 'https://quire.io/oauth';
const tokenUrl = 'https://quire.io/oauth/token';
const apiUrl = 'https://quire.io/api';
Step 2. Redirect User to Authorize App on Quire
Generate an authorization url that you will redirect your users to Quire’s OAuth endpoint URI. This will show a web page where logged in Quire users can authorize your application to access their content.
Sample URL:
https://quire.io/oauth?client_id=your-client-ID&redirect_uri=your-redirect-uriAn authorization link view example might look like:
var http = require('http');
var url = require('url');
var server = http.createServer(function (req, res) {
    var uri = url.parse(req.url, true);
    if (uri.pathname == '/') {
        //..
    } else if (uri.pathname == "/install") {
        var authUrl = authorizationUrl
            + '?client_id=' + clientId
            + '&redirect_uri=' + encodeURIComponent(redirectURI);
        res.writeHead(200, { 'Content-Type': 'text/html' });
        res.write(
             '<html><body>'
            + '<a href="' + authUrl + '">Connect Quire</a>'
         + '</body></html>');
        res.end();

    } else if (uri.pathname == "/callback") {
        //...
    }
});
server.listen(3000);
The state parameter is a random string used to prevent Cross-Site Request Forgery (CSRF) attacks. You should randomly generate a character string. It will be passed back to your app, unchanged, in Step 3. Your application should validate this value. Though it is optional, we strongly recommend including this parameter.
Sample URL:
https://quire.io/oauth?client_id=your-client-ID&redirect_uri=your-redirect-uri&state=lpcl9v94zStep 3. Handle the OAuth 2.0 server response
The OAuth 2.0 server responds to your application's access request by using the URL specified in the redirect_uri.
If the user approves the access request, then the response contains an authorization code. If the user does not approve the request, the response contains an error message. The authorization code or error message that is returned to the web server appears on the query string, as shown below:
An error response:
http://localhost:3000/callback?error=access_deniedAn authorization code response:
http://localhost:3000/callback?code=4/P7q7W91a-oMsCeLvIaQm6bTrgtp7A callback example might look like:
//...
} else if (uri.pathname == "/callback") {
   var result = uri.query;
   var message = 'Auth fail';
   if (result["error_description"] != null) {
       message = result["error_description"];
       if (result["error"] == 'access_denied') {
           //display reject message
       }
       messageView(res, message);
   } else if (result["code"] != null) {
       return exchangeAccessToken(result["code"])
       .then(function(data) {
            var token = data['access_token'];
            message = token != null ? 'Success': 'Fail';
            messageView(res, message);
        });
   }
}
When the user is redirected back to your application redirect_uri, a code and state parameter will also be present in the querystring parameters. The state is your CSRF anti-forgery token to validate the request.
Extract the code and state from the query string parameters. The state may be validated at this point.
A validate example might look like:
} else if (result["code"] != null) {
    if (result["state"] != stateFromSession(res))
        return messageView(res, 'invalid state');

    return exchangeAccessToken(result["code"])
    .then(function(data) {
         var token = data['access_token'];
         message = token != null ? 'Success': 'Fail';
         messageView(res, message);
     });
}
Step 4. Exchange authorization code for access token
Your application needs to make a POST call to the token endpoint with the extracted authorization code and the request parameters in the below.
A request an access token example might look like this:
var request = require('request');
function exchangeAccessToken(code) {
    return new Promise(function(resolve, reject){
        request.post({
            url: tokenUrl,
            form: {
              grant_type: 'authorization_code',
              code: code,
              client_id: clientId,
              client_secret: clientSecret,
              redirect_uri: redirectURI
            }
          },
          function (error, httpResponse, body) {
            if (error) {
              return reject(error);
            }
            resolve(JSON.parse(body))
          });
    });
}
The access token you receive in response will be a JSON format.
Example Response:
{
  "access_token":"ACCESS_TOKEN",
  "token_type": "bearer",
  "expires_in":2592000,
  "refresh_token":"REFRESH_TOKEN"
}
The token should be kept carefully and permanently since you need it to access every Quire API.
How do you make API calls with the Quire access token?
Your app now has an access token that can be used to make API calls on user's behalf.
Call the API
Make the API call passing the access token as a bearer token in the header of the request.
An api call example might look like:
function getCurrentUser(token) {
    return new Promise(function(resolve, reject){
        request.get({
            url: apiUrl + '/user/id/me',
            headers: {
              "Authorization": "Bearer " + token
            }
          },
          function (error, httpResponse, body) {
            if (error) {
              return reject(error);
            }
            resolve(JSON.parse(body))
          });
    });
}
Example Response:
{
  "email": "john@gmail.cc",
  "website": "https://coolwebsites.com",
  "id": "My_ID",
  "description": "This is *cool*!",
  "url": "https://quire.io/u/My_ID",
  "nameText": "My Name",
  "nameHtml": "My Name",
  "descriptionText": "This is cool!",
  "descriptionHtml": "This is <i>cool</i>!",
  "image": "https://quire.s3.amazonaws.com/oid/image.jpg",
  "iconColor": "37",
  "name": "My Name",
  "oid": "Dyh2YkFcu9uLgLFIeN1kB4Ld"
}
How do you refresh an expired Quire API access token?
An access token intentionally is meant for short-term use only. This is an important security mechanism of OAuth 2.0. When using the Authorization Code Grant Flow, the access tokens have a one-hour lifetime by default.
When an access token expires, an HTTP 401 error will be returned:
{
  code: 401,
  message: 'Invalid or expired token.'
}
Your application will need to refresh the access token.
function refreshToken(refreshToken) {
    return new Promise(function(resolve, reject){
        request.post({
            url: tokenUrl,
            form: {
              grant_type: 'refresh_token',
              refresh_token: refreshToken,
              client_id: clientId,
              client_secret: clientSecret
            }
          },
          function (error, httpResponse, body) {
            if (error) {
              return reject(error);
            }
            resolve(JSON.parse(body))
          });
    });
}
Alternatively, your application could redirect the user to the authentication flow.
What are the most common mistakes developers make with the Quire API?
After watching teams build against the Quire API, the same five problems recur. None are subtle; all are avoidable.
1. Storing the client secret in client-side code. The client secret is exactly that, a secret. If it ends up in a mobile app binary or a browser bundle, anyone can extract it and impersonate your app. The secret should live only on a server you control. If your app is purely client-side (single-page app, mobile), use the OAuth 2.0 PKCE flow instead of embedding the secret.
2. Forgetting to validate the state parameter. The state parameter exists to prevent CSRF attacks. If you skip validating it on the callback, you've left a hole that a malicious site can use to silently associate a Quire account with an attacker's app session. Generate state per-request, store it in the session, and reject any callback where the returned state doesn't match.
3. Treating the access token as permanent. Access tokens expire after one hour. Apps that store the token and never refresh it work fine on Day 1 and break silently on Day 2. Build the refresh-token loop before you ship anything, not as a "fix it when users complain" patch.
4. Polling the API for changes. Polling burns rate limit, latency, and battery. If you need to react to changes in Quire, use webhooks instead. The webhook ships the event to you instantly; the API call you would have made to detect that event never has to happen.
5. Skipping the redirect URL allowlist. Every OAuth app registration accepts a list of redirect URLs. If you wildcard it or skip configuring it precisely, an attacker can register their callback as your redirect target and intercept authorization codes. Add only the exact URLs your app actually uses.
If you're building against the API for the first time, the fastest way to learn the patterns is to fork an existing integration like the n8n connector and study how it handles auth, refresh, and error states.
When isn't the Quire API the right fit?
Three patterns where you should reach for a different integration surface instead.
- You only need to react to events, not query state. Webhooks are simpler, push-based, and don't require user authorization for read-only event subscriptions. If your app's job is "ping me when something happens", use webhooks, not the API.
- You're building a Claude or LLM agent integration. The Quire MCP server is the right surface here. It handles auth, ships a standard schema, and means you don't write OAuth code yourself. MCP is purpose-built for this; rolling your own with the OAuth API is more work for the same outcome.
- You're doing a one-shot data export. If you just need to pull a project's data once for analysis or backup, the n8n integration or a manual CSV export will save you a week of development time.
If none of those apply, the OAuth API is your tool.
Frequently Asked Questions
Does the Quire API require a paid Quire plan?
No. The Quire API is available on every plan including the free tier. Rate limits apply on all plans; review the API documentation for the current per-app limits.
What programming languages does the Quire API support?
The API is HTTP-based with JSON request and response bodies, so any language with an HTTP client and JSON parser works. The examples in this post are JavaScript, but the same flow works identically in Python, Go, Ruby, PHP, and any other language. There's no official client library; the API surface is small enough that a thin wrapper around your language's HTTP client is the common pattern.
How long do Quire access tokens last?
Access tokens expire after one hour by default. Refresh tokens last longer and can be used to obtain new access tokens without re-prompting the user. Build the refresh-token loop into your app from Day 1.
Can I use the Quire API for read-only access?
Yes. OAuth scopes let you request only the permissions your app needs. If your app only reads tasks, request read scopes. Quire users will see the requested scopes on the authorization page and can decline if the request feels excessive, so over-requesting hurts conversion.
What's the difference between the Quire API and the Quire MCP server?
The API is a general-purpose REST surface for any app that wants to read or modify Quire data on behalf of a user. The MCP server is purpose-built for Claude and other LLM agents: it handles auth, exposes a standard tool schema, and means you don't write OAuth code yourself. Use the API for traditional app integrations; use MCP for LLM agent integrations.
Where do you go from here?
That's the full OAuth 2.0 flow for the Quire API: OAuth app setup, four-step authorization, access token usage, and the refresh loop. The most common reason developers ship a working integration that breaks two days later is treating the refresh loop as a later fix instead of building it in from Day 1.
Get started at the Quire developer app console or read the full API reference. If you'd rather not write OAuth code at all, the Quire MCP server handles authentication for you and is the right choice for LLM agent integrations. For event-driven integrations, webhooks are usually a better fit than the polling pattern most first-time API integrations end up with.