features · Oct 27, 2016
How to migrate to Quire? Copy and paste.
Last updated: May 29, 2026
Quire's copy-paste import handles text editors, Gmail, Excel, and CSV. Multi-line text becomes multiple tasks (one per line), email becomes a single task with subject and body, spreadsheet columns map to task fields, and nested tasks work via Parent + ID columns. Faster than JSON import for smaller migrations.
Many of you have asked about a way to import your work from a different app into Quire, without going through the trouble of entering them one by one.
Now, we have the answer: Copy and paste.
The pattern matters more than the tool. Most knowledge work starts in one of three places (a chat thread, a doc, or a spreadsheet) and the friction in moving it to a task system is what kills adoption of new PM tools. Asana's Anatomy of Work report keeps surfacing the same pattern across years of surveys: knowledge workers spend a significant slice of every week on "work about work" instead of work itself, and a chunk of that is just retyping things that already exist somewhere else. Quire's copy-paste import is built to close that gap.
Be it an Excel sheet with data, a Word document of bullet list, or an email from your coworker, you can easily move them to Quire and continue where you left off, such as breaking down ideas into step-by-step tasks to easily keep track of them and collaborate with your team.
How does Quire's copy-paste compare to other PM tools' import options?
Most PM tools have some kind of import path. They differ in whether copy-paste is a first-class affordance or requires file upload, and what the parse intelligence does.
The pattern: copy-paste import is common but the format intelligence varies. Quire's email and spreadsheet handlers (especially Parent + ID for nesting) are the unusual part of this row.
Here are a few examples:
How do you copy-paste from a Text Editor into Quire?
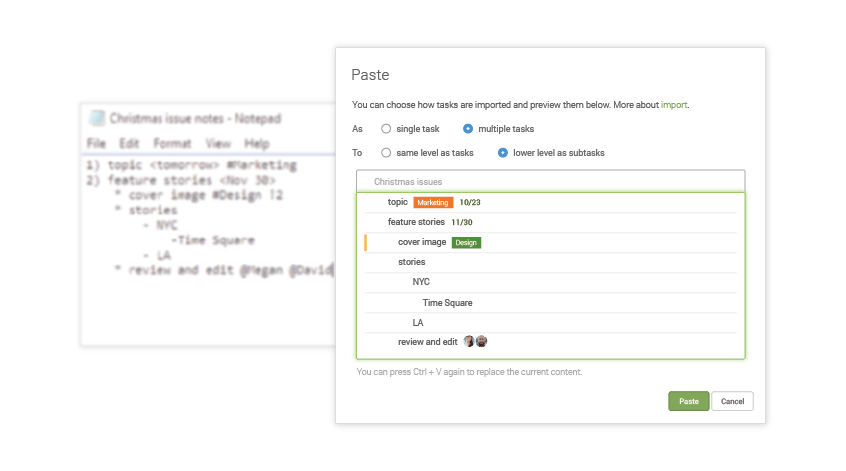
You may have a bullet list or notes in text editors such as Notepad and Word.
First, you press Ctrl + C (Cmd + C for Mac) or right click to copy the content.
Next, you go to your Quire project, click on a task and right click to select Paste.
Tip: You can skip this step by simply pressing Ctrl + V (or Cmd + V for Mac) to paste what you copied in a Chrome, Firefox or Microsoft Edge browser.
Then, you press Ctrl + V (Cmd + V for Mac) or right click to paste what you copied for preview.
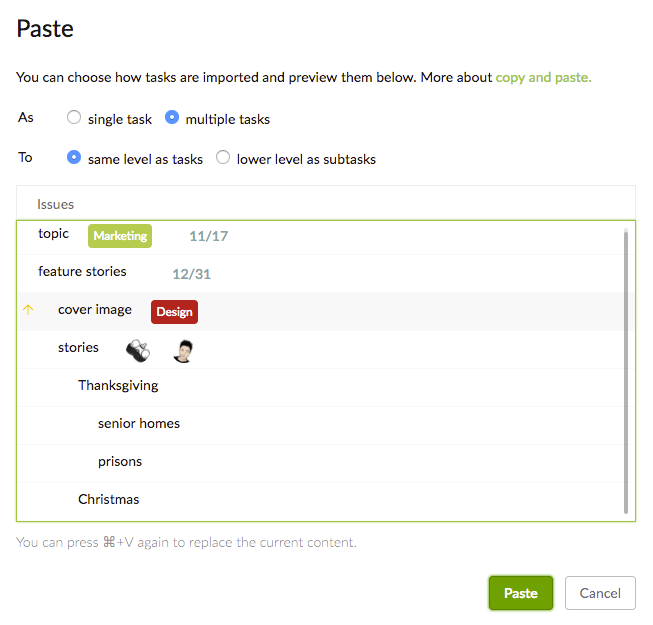
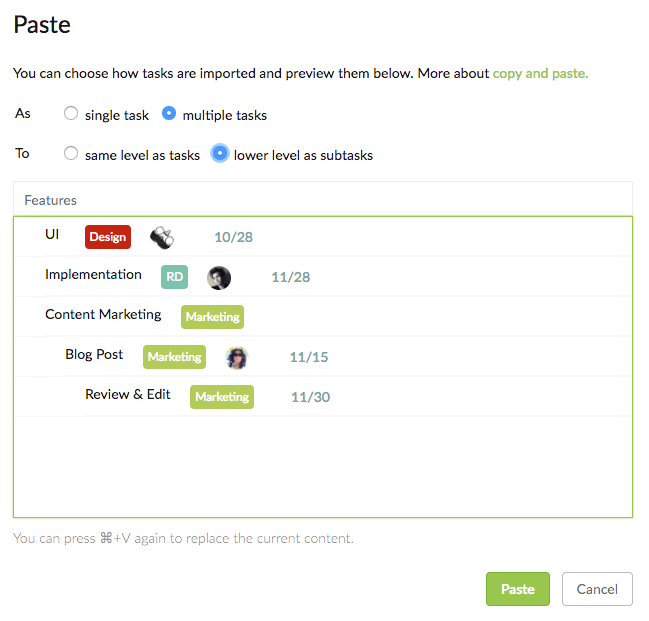
By default, we recognize the list as multiple tasks, with each line being the name of each task and subtask.
We also automatically translate texts like <tomorrow>, #Marketing, @Megan and !2 into due date, tag, assignee and priority, and omit unnecessary numbers, characters and punctuation marks like “-” and “*” which are supported by Markdown.
If you manually select single task, we will recognize the list you pasted as a single task, with the first line as its name and the rest as its description.
Note: The @assignee and #tag you typed must already be your project members and tags to be added.
How do you copy-paste from Gmail into Quire?
If you want to turn an important email into a task, here is what you do.
You copy the subject and its content.
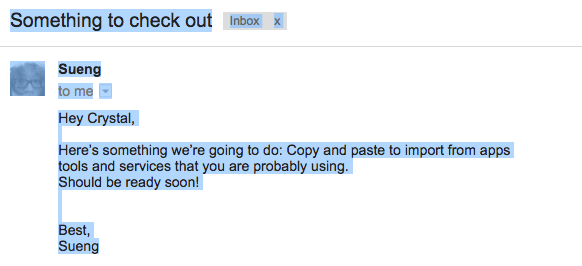
Then, you go to Quire to paste it.
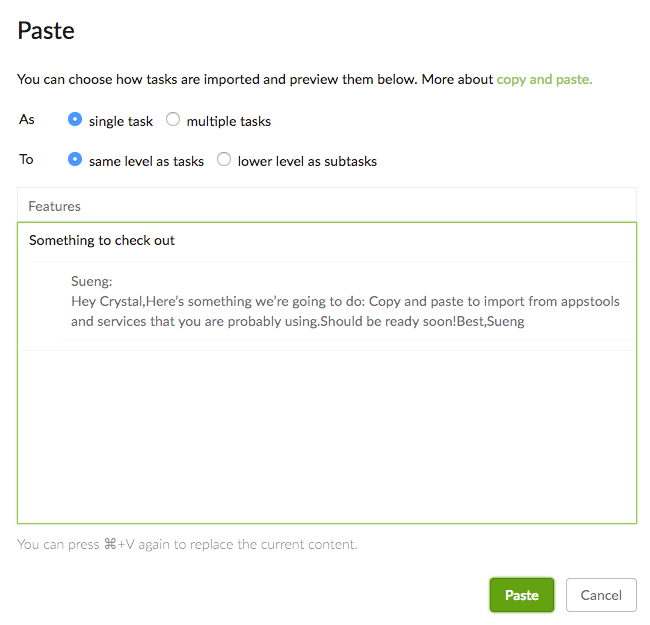
By default, we recognize what you pasted as a single task, with the subject as its name and the content as its description.
We also automatically omit the unnecessary detail like “to me” and “5:25 PM (23 hours ago).”
If you manually select multiple tasks, we then recognize the content you pasted as multiple tasks, with each line being the name of each task.
For other email service providers including Hotmail and Outlook, we will recognize what you pasted as multiple tasks, with each line being the name of each task.
How do you copy-paste from a Spreadsheet into Quire?
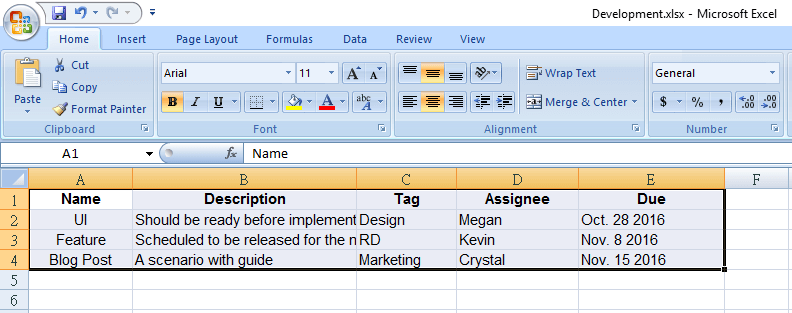
First, you copy the header and content in an Excel, Google Sheets or other spreadsheet applications.
Then, you go to Quire to paste what you copied for preview.
By default, we recognize what you pasted as multiple tasks, with each row being the name, attributes and description of each task.
Only columns called Name, Assignee, Tag, Start, Due, Priority, Status, Description, Parent and ID, in no particular order, and the cells below them are recognized. The rest is omitted.
Note: The header column names must be exactly the same with the first letter capitalized.
You can create a tree structure with tasks and subtasks by adding a column called Parent.
For the column Parent to be recognized, you need to have another column called ID.

Under the column ID, you first assign an ID to the parent task.

Then, you go to the task you want to make as the subtask, and enter the parent task ID you have just assigned under the Parent column.

Ta-da! Now you have a tree structure with tasks and subtasks.
If you manually select single task, we will recognize the data you pasted as a single task, with the first line as its name and the rest as its description.
Also, keep in mind that if a task has more than one assignee or tag, you need to have a column for each assignee or tag. Each column will have the same header name (Assignee or Tag).
Note: What you typed under columns Assignee and Tag must already be your project members and tags to be added.
When you paste from Excel, there are two limitations to keep in mind:
Date Format.
For columns Start and Due to be recognized, you need to enter dates in the format of the country you selected in your Account Settings. For example, if you selected English (United States), the date format should be Nov 18, 2016. In this example, 11/18/2016, 11-18-2016 and 11.18.2016 are recognized too.
Priority.
For column Priority to be recognized, you need to enter Low, Medium, High or Urgent (not case sensitive).
How do you import CSV data into Quire?
With a CSV file, it is the same as copying and pasting from a spreadsheet file.
Once again, only those called Name, Assignee, Tag, Start, Due, Priority, Status, Description, Parent and ID and what is below them are recognized.
And keep in mind that if a task has more than one assignee or tag, you need to have a column for each assignee or tag. Each column will have the same header name (Assignee or Tag).
Note: What you typed under columns Assignee and Tag must already be your project members and tags to be added.
In short, we have made migration quick and easy. With copy and paste.
You can now bring your work into Quire, from apps or services that you are probably using everyday, including Excel, Word and Gmail, and get it rolling with your team in just seconds!