Quire Board View Permalink
A Kanban board organizes tasks as cards across columns, where each column represents a stage in your workflow. Teams use it to see what is in progress at a glance and spot bottlenecks before they build up. In Quire, the Board View uses this layout to help you track task progress and manage execution alongside your nested task list.
You can switch between any of Quire’s views at any time without changing your task structure.

Board View presents tasks in a flat, column-based layout, making it easier to:
- Track work in progress
- Move tasks between statuses
- Focus on execution rather than hierarchy
By default, subtasks are displayed as independent cards. If you want to preserve task hierarchy, you can enable Task Bundle to nest subtasks under their parent tasks.
Switch to Board View
You can open Board View from any project List or Sublist. It is also available in your Organization, Folders, Smart Folders, and My Tasks for a cross-project Kanban layout.
- Click the Board icon in the upper-right corner of the main panel.
-
Or press 2 to switch directly to Board View.
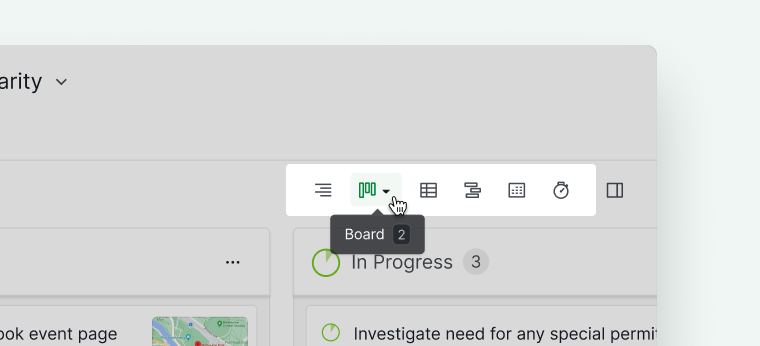

Tip: Press 2 again to open the view menu, then use number keys or arrow keys to navigate options.
Create Tasks in Board View
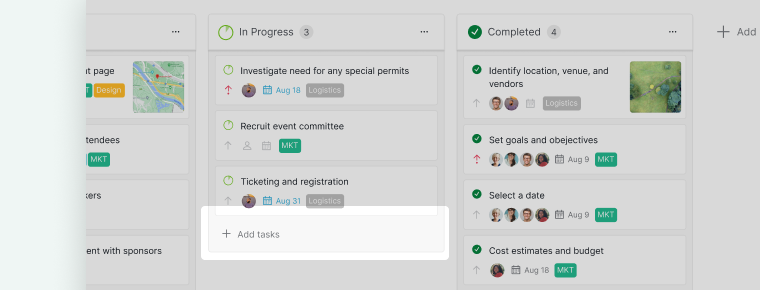
You can add tasks directly within each column.
- Click + Add tasks at the bottom of a column.
- Enter the task name.
- Press Enter to continue adding tasks.
-
Press Esc to finish.

Move and Reorder Tasks
You can reorganize work visually using drag and drop.
- Drag a task card to another column to change its status.
- Drag tasks up or down within the same column to reorder priority.
Note: Task order in Board View does not affect the task order in Tree (List) view.

Learn more about how to shuffle your board by columns, or group tasks by assignee, status, or category using Swimlanes.
Customize Task Cards
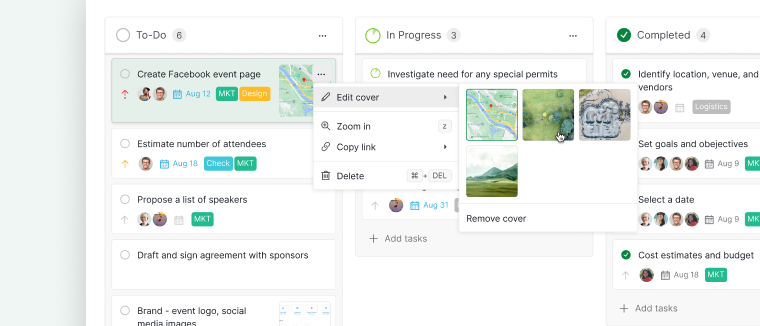
If a task includes an attached or embedded image, it will automatically appear as the task cover.

To change the cover:
- Click the More options icon on the task card.
- Select Edit cover.
-
Choose the image you want to display.

Manage Custom Fields in Board View
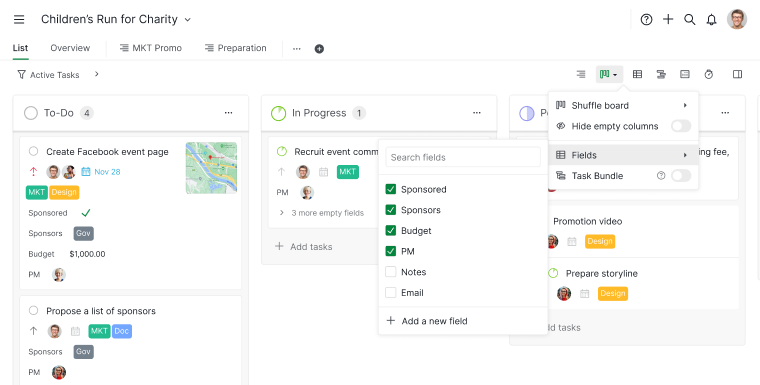
Custom fields added to your project are automatically visible on task cards in Board View. You can control which fields appear.
- Click the Board icon in the upper corner of the main panel.
- Hover over Fields.
-
Toggle field visibility using the checkboxes.

Frequently Asked Questions
What is a Kanban board and how does it differ from a task list?
A Kanban board organizes tasks as cards across columns, where each column represents a stage in your workflow, such as To Do, In Progress, and Done. It gives teams a visual snapshot of work in progress and makes it easy to spot bottlenecks as tasks move through stages. Unlike a nested task list, which is structured for planning and breaking down work into a hierarchy, a Kanban board is optimized for execution and status tracking. In Quire’s Board View, subtasks appear as independent cards by default. You can enable Task Bundle to nest subtasks under their parent tasks if you prefer to keep the task hierarchy visible.
Is Quire Board View available beyond individual projects?
Yes. You can use Board View in your Organization, Folders, Smart Folders, and My Tasks to visualize and manage tasks across multiple projects as Kanban columns. This gives you a cross-project visual layout for tracking status and workflow at any scope.
What’s the keyboard shortcut to switch to Board View in Quire?
Press 2 to switch directly. Press 2 again to open the view menu, then use number keys or arrow keys to navigate options.
How do I create a task in Quire Board View?
Click + Add tasks at the bottom of any column, type the task name, and press Enter to continue adding. Press Esc when done.
How do I move a task to a different status column in Quire Board View?
Drag the task card to the target column to change its status. Drag within the same column to reorder tasks.
Does reordering tasks in Board View affect the List view order in Quire?
No. Task order changes in Board View do not affect the task order in Tree (List) view. The two views maintain independent orderings.
How do I change the cover image on a task card in Quire Board View?
Click the More options icon on the task card, select Edit cover, then choose the image to display.
How do I show or hide custom fields on task cards in Quire Board View?
Click the Board icon in the upper corner of the main panel, hover over Fields, then toggle visibility using the checkboxes.