Single Sign-On (SSO) in Quire Permalink
Single Sign-On (SSO) is only available in the Enterprise plan. More information can be found at our pricing page.
Single Sign-On (SSO) in Quire lets members authenticate through a centralized Identity Provider (IdP) using SAML 2.0. Supported providers include Okta, OneLogin, Azure AD B2C, and any other SAML 2.0-compatible IdP.
SSO Overview
SSO allows users to log in to Quire using one set of credentials through their Identity Provider instead of managing a separate Quire password.
With SSO enabled for your Quire organization:
- Members log in using their company identity provider
- No separate Quire password is required
- Authentication is centralized and more secure
- Login management is simplified for IT administrators
Quire supports SAML 2.0 authentication and works with:
- Okta
- OneLogin
- Azure AD B2C
- Any IdP that supports SAML 2.0
Once SSO is enabled, organization members will log in via the IdP instead of using a Quire password.
Configure Identity Provider (IdP)
Before enabling SSO in Quire, you must first configure your Identity Provider.
Step 1: Create a SAML 2.0 Application
- Log in to your Identity Provider admin console.
- Create a new SAML 2.0 application.
- Enter the following SAML configuration details:
| SAML Attribute | Map to your identity provider |
|---|---|
https://quire.io/sso/login |
SAML Assertion Consumer Service (ACS) URL for the application |
https://quire.io/sso/metadata |
SP Entity ID of the application |
| Member’s email address | Name ID format |
Step 2: Collect Required SAML Details
After creating the application, copy the following information:
- Identity Provider URL
- Entity ID
- Base64 X.509 Certificate
Step 3: Assign Users in Your Identity Provider
- Add users or groups to the newly created Quire SAML application.
- Ensure proper access permissions are assigned.
Users must be assigned in the IdP before they can authenticate via SSO.
Configure SSO in Quire
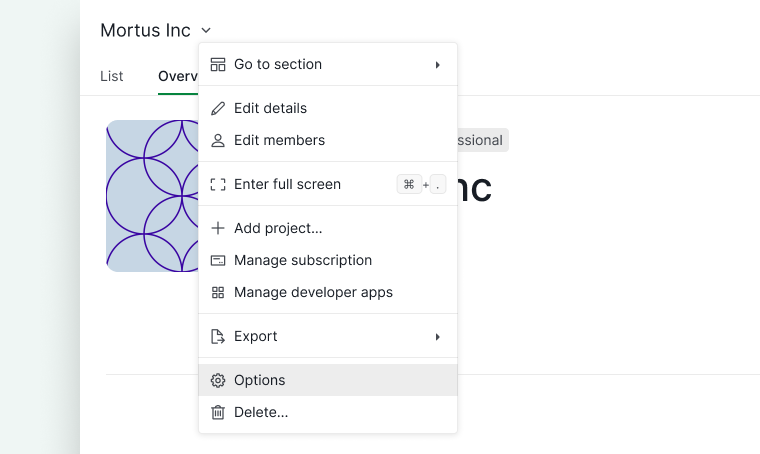
Step 1: Open Organization Settings
- Click the dropdown menu icon next to your organization name.
-
Select Options.

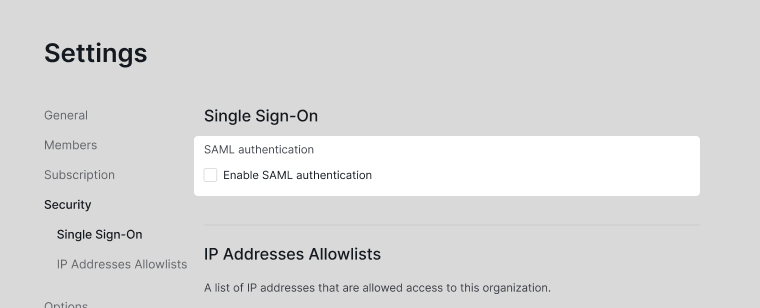
Step 2: Enable SAML Authentication
- Go to the Security tab.
-
Turn on SAML authentication.

Step 3: Enter SAML Configuration Details
- Paste the Identity Provider URL.
- Enter the Entity ID.
- Paste the Base64 X.509 certificate.
- Click Test SSO to verify the setup.
-
If successful, click Save.
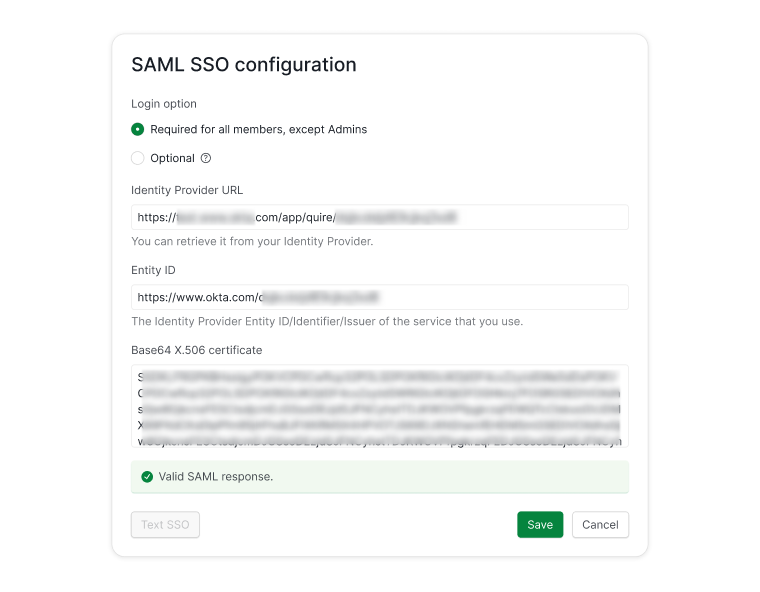

Required vs. Optional SSO
You can configure SSO as:
- Required – All members must log in via SSO.
- Optional – Members can log in using either password or SSO.
Note: Organization admins must always log in using their Quire password.
Once configured successfully, members will no longer need a separate Quire password.
Azure AD B2C Integration
Step 1: Set Up Azure AD B2C
- Log in to the Azure Portal.
- Create custom policies.
- Register a SAML application.
- Configure user flows for authentication.
Follow Microsoft’s official documentation for detailed setup instructions.
Step 2: Configure NameID Format
Quire requires the NameID format to be:
userPrincipalNameoremail
Do not use objectId.
If using userPrincipalName, modify:
TrustFrameworkBase.xmlSignUpOrSigninSAML.xml
TrustFrameworkBase.xml example:
<!-- The following technical profile is used to read data after user authenticates. -->
<TechnicalProfile Id="AAD-UserReadUsingObjectId">
  <Metadata>
    <Item Key="Operation">Read</Item>
    <Item Key="RaiseErrorIfClaimsPrincipalDoesNotExist">true</Item>
  </Metadata>
  <IncludeInSso>false</IncludeInSso>
  <InputClaims>
    <InputClaim ClaimTypeReferenceId="objectId" Required="true" />
  </InputClaims>
  <OutputClaims>

    <!-- Optional claims -->
    <OutputClaim ClaimTypeReferenceId="signInNames.emailAddress" />
    <OutputClaim ClaimTypeReferenceId="displayName" />
    <OutputClaim ClaimTypeReferenceId="otherMails" />
    <OutputClaim ClaimTypeReferenceId="givenName" />
    <OutputClaim ClaimTypeReferenceId="surname" />
    <OutputClaim ClaimTypeReferenceId="userPrincipalName" /> <!-- add -->
  </OutputClaims>
  <IncludeTechnicalProfile ReferenceId="AAD-Common" />
</TechnicalProfile>
SignUpOrSigninSAML.xml example:
<RelyingParty>
  <DefaultUserJourney ReferenceId="SignUpOrSignIn" />
  <TechnicalProfile Id="PolicyProfile">
    <DisplayName>PolicyProfile</DisplayName>
    <Protocol Name="SAML2"/>
    <OutputClaims>
      <OutputClaim ClaimTypeReferenceId="displayName" />
      <OutputClaim ClaimTypeReferenceId="givenName" />
      <OutputClaim ClaimTypeReferenceId="surname" />
      <OutputClaim ClaimTypeReferenceId="email" DefaultValue="" />
      <OutputClaim ClaimTypeReferenceId="identityProvider" DefaultValue="" />
      <OutputClaim ClaimTypeReferenceId="objectId" PartnerClaimType="objectId"/>
      <OutputClaim ClaimTypeReferenceId="userPrincipalName" PartnerClaimType="userPrincipalName"/> <!-- add -->
    </OutputClaims>
    <SubjectNamingInfo ClaimType="userPrincipalName" ExcludeAsClaim="true"/> <!-- modify -->
  </TechnicalProfile>
</RelyingParty>
If you plan to change the format to email, you can refer to this resource for additional guidance.
Step 3: Retrieve Required Information from Azure
After setup, collect:
- Metadata URL
- Identity Provider URL
- Entity ID
- Base64 X.509 Certificate
Below are examples of what this information may look like:
- Metadata:
https://your-tenant.b2clogin.com/your-tenant.onmicrosoft.com/B2C_1A_signup_signin_saml/samlp/metadata - Identity Provider URL:
https://your-tenant.b2clogin.com/your-tenant.onmicrosoft.com/B2C_1A_signup_signin_saml/samlp/sso/login - Entity ID: You defined in
TrustFrameworkExtensions.xml(<Item Key="IssuerUri">). For example,https://your-tenant.onmicrosoft.com/quire - Base64 X.509 certificate: Extract from metadata
<X509Certificate>MIIDizCCAnOgAwIBAgIUU9ndt…
Then follow the steps in Configure SSO in Quire.
Troubleshooting SSO
If a member changes their email address in Quire, they will not be able to log in via SSO until the new email is updated in the Identity Provider.
To fix this:
- Update the member’s email address in the Identity Provider.
- Ensure the NameID matches the updated email.
- Ask the member to try logging in again.
Read more on our blog about Single sign-on with Quire. Also restricting access by network? See IP Address Allowlists, or check Securing and Administering Your Quire Workspace for the full picture.
Frequently Asked Questions
Which identity providers does Quire SSO support?
Any SAML 2.0-compatible IdP, including Okta, OneLogin, and Azure AD B2C. SSO is available on the Enterprise plan only.
How do I enable SSO in Quire?
Configure a SAML 2.0 app in your IdP using Quire’s ACS URL (https://quire.io/sso/login) and Entity ID (https://quire.io/sso/metadata), collect the IdP URL, Entity ID, and certificate, then go to Organization Options > Security tab, enable SAML authentication, paste those details, click Test SSO, and save.
Can I make SSO required or optional for my Quire organization?
Yes. Required forces all members to log in via the IdP. Optional lets members choose between their Quire password or SSO.
Do organization admins have to use SSO in Quire?
No. Admins always log in with their Quire password, even when SSO is set to Required for other members.
What should I do if a member cannot log in via SSO after changing their email?
Update the member’s email in the Identity Provider so the NameID matches the new address. The member can then log in via SSO again.
What NameID format does Quire require for Azure AD B2C SSO?
Use userPrincipalName or email. Do not use objectId — it causes authentication failures.
Can clients log in to Quire using social media accounts like Facebook or LinkedIn?
Yes, via Azure AD B2C integration. Supported providers include Facebook, X (formerly Twitter), LinkedIn, Microsoft accounts, and local identity accounts.