Quire Formula Guide Permalink
Formulas in Quire allows you to take existing task or project data and calculate new values automatically. You can reference built-in fields or custom fields, apply operators or functions, and display numeric or text-based results inside a custom field.
Write a Formula
In the Free subscription plan, you can add one formula to the custom field for each project. Upgrade your subscription plan to add more formulas. More information can be found on our pricing page.
To write a formula, you first need to create a Formula custom field. Once created, you can enter a formula that references existing values and returns a calculated result.
For example, if you want to divide the time spent for your task by 2:
timeSpent/2
Quire will automatically calculate the value for each task and display the result in the custom field.
Learn how to create a custom field to add your formulas.
Perform Calculations with Formulas
Arithmetic Operators
You can perform common arithmetic calculations using the following operators:
- Addition:
+ - Subtraction:
- - Multiplication:
* - Division:
/
For example, to calculate task duration by subtracting the start date from the due date:
due - start
Tip: Use parentheses ( ) to control calculation order. For example, if you type something like (due - start) *2, then the due date and start date subtraction will precede the multiplication of 2.
Functions
Functions provide a faster way to perform more advanced calculations.
For example, to calculate the total of time spent and estimated time:
SUM(timeSpent, estimated)
You can also use comparison operators to return logical results.
priority >= high
This checks whether a task’s priority is higher than or equal to High.
Learn all the different operators and functions you can use in the Quire formulas.
Formula Writing Best Practices
Dot Operator
The dot operator . allows you to retrieve specific values from related objects.
For example, if you want to list out all the names of the subtasks:
subtasks.name
Another example, if you want to get the priority of a parent task:
parent.priority
Tip: We have listed out all the different fields that you can specify .
Field Names with Spaces
When naming your custom field names, you need to avoid using these following characters: quotation marks ("), backslash (\) and curly brackets (}).
When referencing custom fields in formulas:
- Field names without spaces can be used directly
- Field names with spaces or special characters (including
@,#,&, etc) must be wrapped in curly brackets{ }
For example, if you added a new field named Cost:
Cost *2
{Cost} *2
If your field name includes spaces, you must wrap them with the curly brackets { }:
{Schedule Variance} *2
Note: The cases are insensitive, so typing something like cost or Cost means the same thing.
Text in Results
To include text in formula results, always wrap text strings in quotation marks.
For example, if you added two custom fields, one for the item ID, and another for the item name:
id + ":" + name
This displays the ID and name separated by a colon.
Identifiers for Members, Tasks, and Tags
You can reference specific entities using identifiers:
- Member:
@member_username - Task:
#task_id - Tag:
#tag_name - Project:
#{project_id}
For example, if you want to call out the due date of task ID 23:
#23.due
Note: No spaces are allowed between # and the ID.
Here’s another example, if you want to know how much time the entire project has spent, you can type something like this in the Organization Overview description:
SUM(#{project_id}.tasks.timeSpent)
Note:
- The project identifier
#{project_id}can only be used in the Organization Overview’s description area. It cannot be used at the task’s or project’s description. - The project id must be wrapped between the curly brackets (for example like this:
#{project_id}) for the project identifier to work correctly. - If the user’s username ID contains
.,-or_, you will need to put it between curly brackets for the identifier to work correctly. - If the tag’s name contains any spaces or special characters including dots (
.), hashtags (#) or numbers etc, then you will need to put the tag name between quotation marks for the tag identifier to work correctly. For example, if the tag name is depending on, the tag name needs to put between quotation marks like this:#"depending on".
Literal Values in Quire Formulas
Literal values are fixed values that do not change during calculation. Quire supports multiple literal formats:
- Number:
123,-1.23 - Text:
"text",'text' - List:
[1,2,3] - Boolean:
true,false - Duration:
12:01,123:12:23,2h 30m,2d 5s,30m - Date and time:
<2022/12/25>,<12/23>,<23>,<2022/01/23 13:10:00>,<2023/12/25 16:00>,<15:15>,<now> - Days:
<today>,<today-1>,<tomorrow+3 13:10:05>,<+5>
Note:
- Text strings can be concatenated: ‘first’ “second”. It is the same as
'first second'. - Days are language-aware (e.g.
<Morgen>in German). - For days,
<+5>equals<today+5>. - For duration, hours can only be in 0-23 and the syntaxes are
hh:mm:ssormm:ss.
Formatting Formula Results
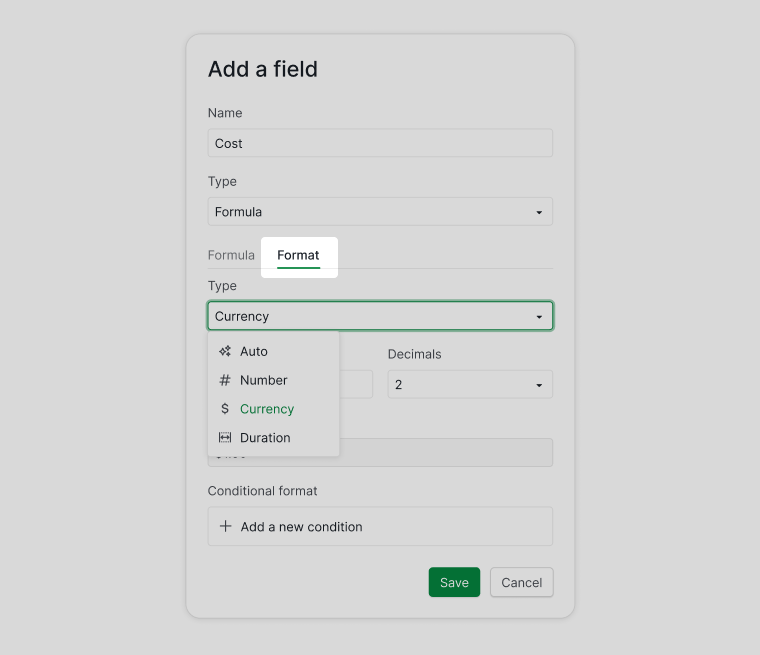
Format Tab
You can format how formula results appear by using the Format tab when creating or editing a formula field.
- Open the formula custom field.
- Click the Format tab.
- Choose the display format.
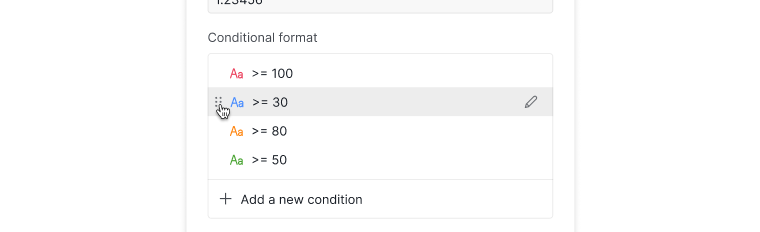
Conditional Colors
Conditional formatting helps highlight important values visually.
- Click Add a new condition.
- Define the condition and choose a color.
- Click Save.
Note: Conditions are applied from top to bottom. Drag the six-dotted icon to reorder them.
Frequently Asked Questions
How do I use formulas in Quire?
Create a Formula custom field, then enter a formula that references task fields and returns a calculated result. The Free plan allows one formula field per project.
What calculations can I perform in Quire formulas?
Quire supports +, -, *, and /. Use parentheses to control calculation order — for example, (due - start) * 2. For advanced calculations, use built-in functions like SUM(timeSpent, estimated).
What literal values can I use in Quire formulas?
Supported literals include numbers (123, -1.23), text ("text"), booleans (true/false), lists ([1,2,3]), durations (2h 30m), and dates (<2022/12/25>, <today>, <today+5>).
How do I reference a custom field with spaces in a Quire formula?
Wrap the field name in curly brackets — for example, {Schedule Variance} * 2. Field names without spaces can be used directly. Field names are case-insensitive.
How do I include text in a Quire formula result?
Wrap text strings in quotation marks — for example, id + ":" + name displays an ID and name separated by a colon.
How do I reference a specific task, member, or tag in a Quire formula?
Use #task_id (e.g. #23.due), @member_username, and #tag_name. For tag names with spaces or special characters, use #"depending on".
How do I format or color-code formula results in Quire?
Open the formula field and click the Format tab to choose a display format. For conditional colors, click Add a new condition, define the rule, and save.